I will explain why Docker is a good choice for development of Rails applications. Next, I will give a step-by-step walkthrough of adding Docker to a fairly standard Rails application.
This content is based on a presentation that I gave at WellRailed, a Wellington, New Zealand based Ruby on Rails meetup in December 2016.
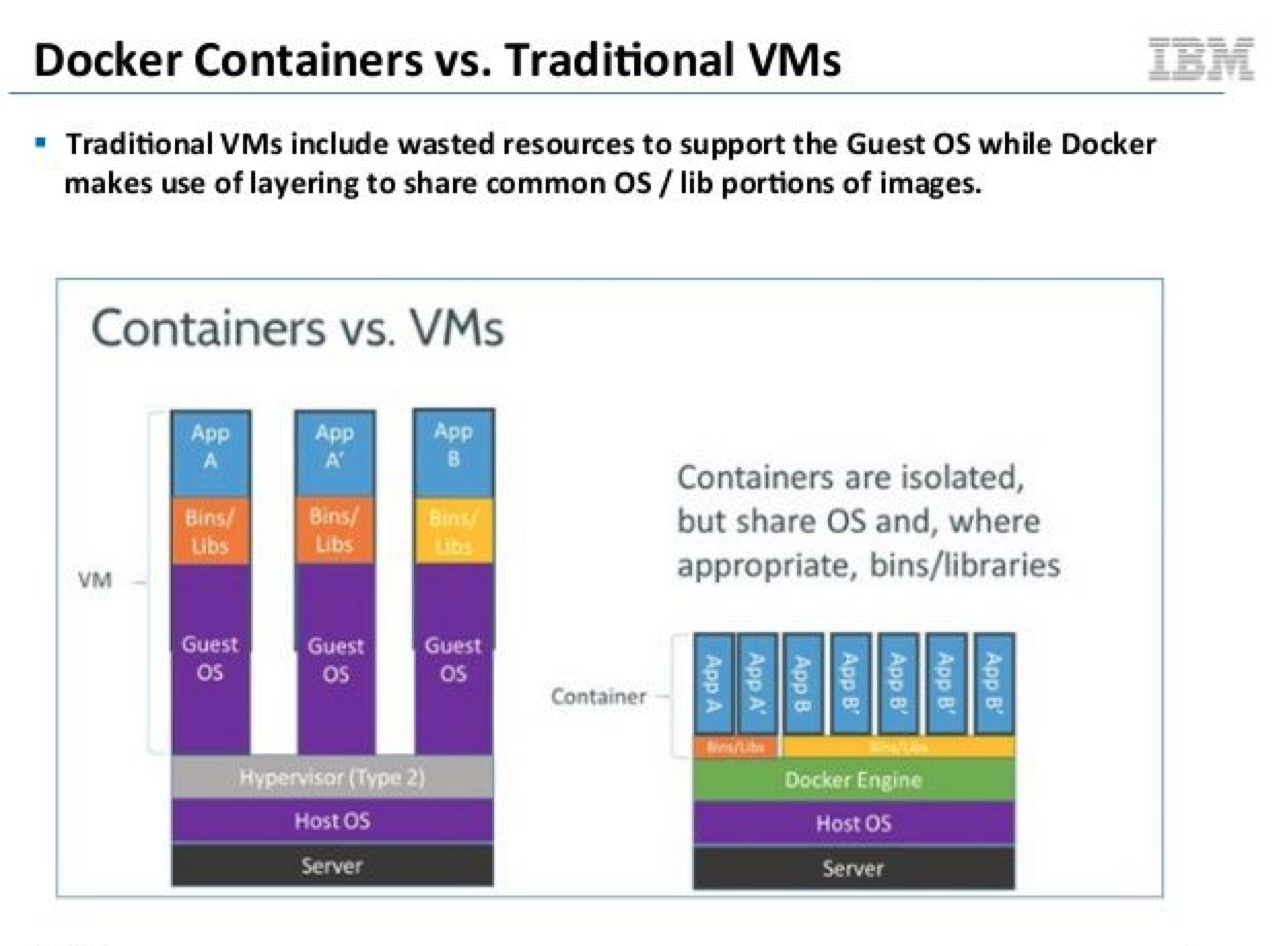
What is Docker?
Docker is a platform that allows you to run containers. These containers, when compared to traditional VMs, are a much faster and more efficient mechanism for isolating the different parts of your application from each other.
This image from IBM gives a good comparison:
Why even bother?
-
Applications often have aged dependencies. You may need to run an older version of Ruby, or a specific version of Postgresql and/or Redis.
-
Matching Operating System. It is common for applications to be developed using Mac OSX and then deployed onto Linux. Docker allows us to develop using a matching operating system, and identify any OS differences, before we deploy.
-
Version differences. You may need to run multiple applications on your development computer. Application X may use Postgresql 9.6 and Application Y may use Postgresql 9.1. Is there an equivalent to RVM for Postgresql or Redis etc?
-
The “I don’t want MongoDB” on my laptop problem. Some application dependency choices are often best forgotten. With Docker you don’t need to have infrequently used dependencies continuously running in the background of your laptop.
Other reasons for Docker
-
Declared dependencies. This will allow you to run a consistent development environment with both your production environment, as well as the other developers on your team.
-
From Zero to Running in a few minutes. No longer do you need to follow a set of step-by-step configuration instructions.
-
Less database bloat. Over time, older database instances and similar artifacts will be scattered over your laptop. These consume space, and can be difficult to track down. With Docker volumes, it is very easy to purge unused container artifacts, and keep disk space consumption to a minimum.
-
Quicker laptop boot times. If you solely use Docker, you no longer need to have a collection of databases, data stores and search engines being started by OSX/Linux/Windows on boot.
Goals for using Docker
A fast start from ZERO in 3 steps:
-
Checkout fresh project from Git
-
Edit/check an environment file
-
Start the app
And when finished development:
-
Stop the app
-
Nothing else is running and consuming resources
How to add Docker to a Rails application
Dependencies
First off, we should itemise the dependencies in this application:
-
Ruby
-
Postgres
-
Redis
-
Sidekiq
Before starting, you should download Docker for your OS. It is free and called Docker Community Edition these days.
Configure the Postgresql Dependency
Docker requires us to define the different dependencies on the application, and this is done in the docker-compose.yml file. This file lives in the root directory of your Rails application.
For our Postgresql dependency, we will define the following
image — this the container definition that is downloaded from https://hub.docker.com/
*container — *this can be thought of as the VM that runs, and is based on the downloaded image.
*volume — *this is the persistent storage which Postgresql will store the data files.
Here is the Postgresql section within the new docker-compose.yml file:
version: '3'
services:
  postgresql:
    image: postgres:9.4.1
    ports:
      - "5432:5432"
    volumes:
      - postgresql-data:/var/lib/postgresql/data
volumes:
  postgresql-data: {}`
Try starting Postgresql
With the docker-compose.yml file saved, we can start up the database by issuing this command:
docker-compose up
See if it works by adjusting the database.yml file:
development:
  adapter: postgresql
  encoding: unicode
  pool: 5
  database: adjuster_development
  url: <%= ENV['POSTGRESQL_URL'] || '`postgresql://postgres@localhost:5432`' %>
test:
  adapter: postgresql
  encoding: unicode
  pool: 5
  database: adjuster_test
  url: <%= ENV['POSTGRESQL_URL'] || '`postgresql://postgres@localhost:5432`' %>`
Next, try creating the database:
rake db:create
Next, run a few tests to see it working:
rake

............................................FFFFFFF........................................
This fails due to the missing Redis container. Let’s fix that
Add to docker-compose.yml file:
redis:
  image: redis:2.8
  ports:
    - "6379:6379"
  volumes:
    - redis-data:/var/lib/redis/data`

volumes:
  redis-data: {}
Then restart docker-compose:
docker-compose down; docker-compose up
Update Rails application sidekiq.rb to use the new Redis container:
Sidekiq.configure_server do |config|
  config.redis = {
    url: "redis://#{ENV['REDIS_HOST' || '127.0.0.1']}:#{ENV['REDIS_HOST']}/12"
  }
end

Sidekiq.configure_client do |config|
  config.redis = {
    url: "redis://#{ENV['REDIS_HOST' || '127.0.0.1']}:#{ENV['REDIS_HOST']}/12"
  }
end
Run the tests a second time:
rake

.............................................................................................................
Win!
Run Rails in a container
We’ve been running Rails from the host operating system, in my case Mac OSX. Now we want to try getting Rails running within a new web container, as defined in the docker-compose.yml file.
Make the following additions:
web:
  build: .
  ports:
    - "3000:3000"
  volumes:
    - .:/app
    - bundle-cache:/bundle
  depends_on:
    - redis
    - postgresql
  command: bin/docker_web`

volumes:
  bundle-cache: {}
Add a .env file:
POSTGRESQL_URL=`postgresql://postgres@postgresql:5432`
REDIS_ADDRESS=redis
Add the new .env file to your .gitignore file.
Next, add a Dockerfile that describes the dependencies and installation steps of your Rails app:
FROM ruby:2.2.1

# Set an environment variable to store where the app is installed to
# inside of the Docker image.
ENV BUNDLE_PATH /bundle
ENV LANG C.UTF-8
ENV INSTALL_PATH /app

RUN echo "deb http://apt.postgresql.org/pub/repos/apt/ trusty-pgdg main" > /etc/apt/sources.list.d/pgdg.list
RUN apt-key adv --keyserver hkp://p80.pool.sks-keyservers.net:80 --recv-keys B97B0AFCAA1A47F044F244A07FCC7D46ACCC4CF8

# Install dependencies:
# - build-essential: To ensure certain gems can be compiled
# - bundler: ensure most recent version is installed
# - nodejs: Compile assets
RUN apt-get update && apt-get install -qq -y build-essential nodejs postgresql-client-9.5 --fix-missing --no-install-recommends
RUN gem install bundler

RUN curl -sL https://deb.nodesource.com/setup_6.x | bash
RUN apt-get install -qq -y nodejs

# This sets the context of where commands will be ran in and is
# documented on Docker's website extensively.

RUN mkdir -p $INSTALL_PATH
WORKDIR $INSTALL_PATH
ADD . $INSTALL_PATH
Next, add the launch script in bin/docker_web
#! /bin/bash
export RAILS_ENV=development
bundle check || bundle install — jobs=10

# Initialise development database
FILE=$INSTALL_PATH/tmp/database_initialised_development.txt
if [ ! -f "$FILE" ]; then
  echo "Creating and loading development databases"
  RAILS_ENV=development bundle exec rake db:setup
  touch "$FILE"
fi

# Initialise test database
FILE=$INSTALL_PATH/tmp/database_initialised_test.txt
if [ ! -f "$FILE" ]; then
  echo "Creating and loading test databases"
  RAILS_ENV=test bundle exec rake db:create db:schema:load
  touch "$FILE"
fi

echo "Migrating and refreshing reference data"
bundle exec rake db:migrate
RAILS_ENV=test bundle exec rake db:migrate

npm install

rm -f tmp/pids/server.pid
bundle exec rails s -p 3000 -b ‘0.0.0.0’
Don’t forget to make this executable:
chmod +x bin/docker_web
Time to try out the application:
docker-compose down
docker-compose up
open [http://0.0.0.0:3000/`](http://0.0.0.0:3000/)
With a little luck, the application should be running.
Adding Sidekiq
Next step is to add the Sidekiq worker. Add the configuration to the docker-compose.yml** **file:
sidekiq:
  build: .
  volumes:
    - .:/app
    - bundle-cache:/bundle
  depends_on:
    - redis
    - postgresql
  command: bin/docker_sidekiq
Add the Sidekiq boot script in bin/docker_sidekiq
#! /bin/bash

export RAILS_ENV=development

bundle check

if (($? > 0)); then
  echo '***********************************************************'
  echo 'Await web container to install updated gems, then restart Docker'
  echo '***********************************************************'
  exit 1
fi

bundle exec sidekiq
Don’t forget to make this executable:
chmod +x bin/docker_sidekiq
Time to try out the application again:
docker-compose down
docker-compose up`
You should see the Sidekiq application also startup and connect to Redis.
Debugging with Docker
Docker can be a little slow on OSX. I believe this is related to how the file system is mounted within the Docker containers.
What you can do, is use Docker to run all of the non-web portions of your application. Then start Rails within the host operating system. We will often run our specs within the host OS too.
Using Pry
If you need to do some debugging within your Rails application inside of the container, you can use the pry-remote gem, and then when you hit a breakpoint:
docker-compose exec web bash
pry-remote
Running multiple containers in parallel
Occasionally, you may need to run a few different Rails applications at the same time. For example, when debugging an data sharing fault on the AddressFinder system, we might want both the AddressFinder API application and the AddressFinder Portal application running together on the same laptop.
This can pose a challenge, as both apps may be configured to expose their ports on 127.0.0.1 and you will end up with a clash.
On solution is to attach all the ports for App #1 to 127.0.0.1 and the ports for App #2 to 127.0.0.2. To achieve this, you’ll first need to have create the 127.0.0.2 address as a loopback alias. We have written a tiny gem that will automate this — it’s called the loopback_alias gem.
AbleTech/loopback_alias
loopback_alias - Creates private 127.0.0.x IP address aliases on OSXgithub.com
You would then update your docker-compose.yml file to refer to the new IP address:
postgresql:
  image: postgres:9.4.1
  ports:
    - "$HOST_IP:5432:5432"
  volumes:
    - postgresql-data:/var/lib/postgresql/data`
and add this line to your .env file:
HOST_IP=127.0.0.2
Other useful containers
Mailcatcher
We make good use of the Mailcatcher gem in development, and it is very easy to drop this into your stack. Just add this to your docker-compose.yml.
mailcatcher:
  image: schickling/mailcatcher
  ports:
    - "1080:1080"
    - "1025:1025"
and the following to your development.rb file:
config.action_mailer.delivery_method = :smtp
config.action_mailer.smtp_settings = {
  address: ENV['SMTP_ADDRESS'] || '127.0.0.1'
  port: ENV['SMTP_PORT'] || 1025
}
Middleman
We’ve defined Docker configuration for all of our static websites that are generated with the Middleman gem.
Procfile
If you are declaring some background tasks in your Procfile for running in production, then these processes could also be added as Docker containers for running in development. You would do this in a similar manner to how the Sidekiq process is configured (above).
Final words
We’ve found adding Docker to be the biggest productivity gain we’ve had for some time at Abletech. Our team are able to quickly get going on new projects, and we know we’re all developing within a consistent environment.
Team members, of varying experience with infrastructure, have been able to checkout Docker-based applications and become productive without needing someone to help.
This year, we look forward to exploring the possibilities of using Docker in production as tools such as Docker Swam and Kubernetes become more mature.